Understand Xamarin Forms Data bindings with F#
Undertand Xamarin Forms data bindings in F#
In Xamarin.Forms, interacting with buttons, labels, lists and all other controls is done via data bindings. Data bindings is one of the core component of the MVVM pattern (model - view - viewmodel). It provides a way to isolate model - view - viewmodel and therefore allows them to be swapped independently (for example for UI changes by swapping with another view or for testing purposes by swapping the viewmodel).
There is a very good tutorial on the Xamarin website about data bindings https://developer.xamarin.com/guides/xamarin-forms/xaml/xaml-basics/data_binding_basics/. In Xamarin.Forms, everything that can be done in XAML can be coded in C# which means that we can code everything in F#.
When coding the whole view, it is easy to get mixed up between views and viewmodels. There is no visible separation compared to using XAML where it is obvious that the XAML file is the view and the code linked to the view is the viewmodel.
So today I would like to show you how you can use data bindings to remove any dependencies between views and viewmodels while build Xamarin.Forms application in F#.
1. Data bindings
2. ListView and Observable collections
3. Commands
The full source code is available on my GitHub - https://github.com/Kimserey/XamarinFormsBindings/blob/master/XamarinFormsBindings/XamarinFormsBindings.fs
1. Data bindings
During the rest of this tutorial we will refer to the UI components as View and to the type which orchestrates the view as ViewModel.
So when we talk about View we might be referring to a button, or a page, or a list, all these are UI components.
Every bindable components from Xamarin.Forms inherit from BindableObject.
BindableObject exposes a method with few overload to bind properties of the current object to a viewmodel SetBinding.
The overload that I use the most is an extension allowing to pass a BindableProperty and a string path.
// C#
public static void SetBinding(
    this BindableObject self,
    BindableProperty targetProperty,
    string path,
    BindingMode mode = BindingMode.Default,
    IValueConverter converter = null,
    string stringFormat = null)
Binding a label
All UI components expose static members which provide links to their BindableProperty.
For example aLabel has a bindable Text property.
type MyPage(viewmodel: obj) as self =
    inherit ContentPage(Title = "Label sample")

    let label = new Label()

    do
        label.SetBinding(Label.TextProperty, "Text")
        self.BindingContext <- viewmodel
        self.Content <- label
Here we define a page which sets a binding on its title property.
The viewmodel is a simple type which provides the bindings required by the view. It does it by implementing properties with matching name given to the bindings.
For the previous example, we will have a MyPageViewModel with a property Title.
type MyPageViewModel() =
    member self.Text with get() = "Hey"
When the binding context (the viewmodel) is set, the property Text of the viewmodel is fetched with the get.
In our example, we bind the text to a property which never changes but what if we need to bind to a property which changes over the time.
Change label text via an entry input
Let’s start by modifying the view to have the label and entry.
type MyPage(viewmodel: obj) as self =
    inherit ContentPage(Title = "Label and entry sample")

    let label = new Label()
    let entry = new Entry()
    let layout =
        let layout = new StackLayout()
        layout.Children.Add(label)
        layout.Children.Add(entry)
        layout

    do
        label.SetBinding(Label.TextProperty, "Text")
        entry.SetBinding(Entry.TextProperty, "Text")
        self.BindingContext <- viewmodel
        self.Content <- layout

type MyPageViewModel() =

    let mutable text = "Default text"

    member self.Text
        with get() = text
        and set value =
            text <- value
            Debug.WriteLine("Value set: {0}", value)
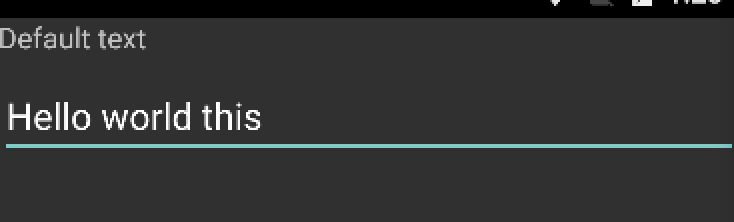
We create a vertical stacked layout which contains the label and entry and define a viewmodel with a default text for the entry and a set function for the property which sets the underlying variable text.
We also write to the Application output via Debug.WriteLine just to check if everything works fine.
When we run the application we can see the default text appearing on the layout but when we change the entry, the label doesn’t change.
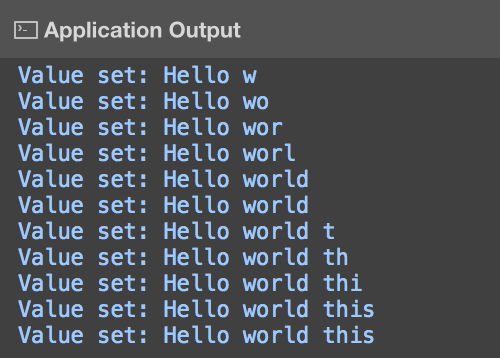
If we check the application log, we can see that the value is correctly set on the viewmodel.
Typing Hello world... in the entry result in the following log:
The binding of the entry property sets the underlying property but the label binding isn't notified that the underlying value has changed.
In order to notify the label that the value has changed, we need the viewmodel to implement INotifyPropertyChanged.
Since all viewmodels will need to notify to the UI that their properties changed, we will create a base viewmodel which implements INotifyPropertyChanged.
type ViewModelBase() =
    let propertyChanging = new Event<PropertyChangingEventHandler, PropertyChangingEventArgs>()
    let propertyChanged  = new Event<PropertyChangedEventHandler,  PropertyChangedEventArgs>()

    interface INotifyPropertyChanged with
        [<CLIEvent>]
        member self.PropertyChanged = propertyChanged.Publish

    member self.PropertyChanging = propertyChanging.Publish

    member self.OnPropertyChanging name =
        propertyChanging.Trigger(self, new PropertyChangingEventArgs(name))

    member self.OnPropertyChanged name =
        propertyChanged.Trigger(self, new PropertyChangedEventArgs(name))
Now using we can notify the label or any other views which bind to the Text property.
type MyPageViewModel() =
    inherit ViewModelBase()

    let mutable text = "Default text"

    member self.Text
        with get() = text
        and set value =
            base.OnPropertyChanging "Text"
            text <- value
            Debug.WriteLine("Value set: {0}", value)
            base.OnPropertyChanged "Text"
And now we get a two way binding on the text property which updates the views and gets updated by the entry_.

2. ListView and Observable collections
To display lists, Xamarin.Forms provides a ListView which derives from the abstract class ItemsView which provides bindable property ItemSources.
The only requirement is that the source must implement IEnumerable therefore if we need to bind a static list we can bind a seq or a list.
type MyPage(viewmodel: obj) as self =
    inherit ContentPage(Title = "ListView sample")

    let listView =
        new ListView(ItemTemplate = new DataTemplate(typeof<TextCell>))

    do
        self.BindingContext <- viewmodel
        listView.SetBinding(ListView.ItemsSourceProperty, "List")
        listView.ItemTemplate.SetBinding(TextCell.TextProperty, "Name")
        self.Content <- listView

type MyPageViewModel() =

    member self.List
        with get() =
            [ { Name = "Greg"; Age = 29 }
              { Name = "Tom"; Age = 29 }
              { Name = "Sam"; Age = 29 } ]
In order to display the list, a data template must be used.
You can create your own by inheriting from ViewCell or you can use the default one, TextCell is one of the default one.
TextCell provides several bindings like TextProperty or DetailProperty which allows us to bind to certain property of the cell.
Another default cell is ImageCell which gives access to an ImageSourceProperty.
Another way of passing the template to DataTemplate is to do it via a function:
new ListView(ItemTemplate = new DataTemplate(fun () -> box <| new MyTextCell()))
This can be useful if we need to pass any argument to the template constructor. Creating your own cell template can be done this way:
type MyTextCell() as self =
    inherit ViewCell()

    let name = new Label()
    let age = new Label()
    let layout =
        let layout = new StackLayout(Orientation = StackOrientation.Horizontal)
        layout.Children.Add(name)
        layout.Children.Add(age)
        layout

    do
        name.SetBinding(Label.TextProperty, "Name", stringFormat = "{0},")
        age.SetBinding(Label.TextProperty, "Age", stringFormat = "{0} years old")
        self.View <- layout

type MyPage(viewmodel: obj) as self =
    inherit ContentPage(Title = "ListView sample")

    let listView =
        new ListView(ItemTemplate = new DataTemplate(fun () -> box <| new MyTextCell()))

    do
        self.BindingContext <- viewmodel
        listView.SetBinding(ListView.ItemsSourceProperty, "List")
        self.Content <- listView
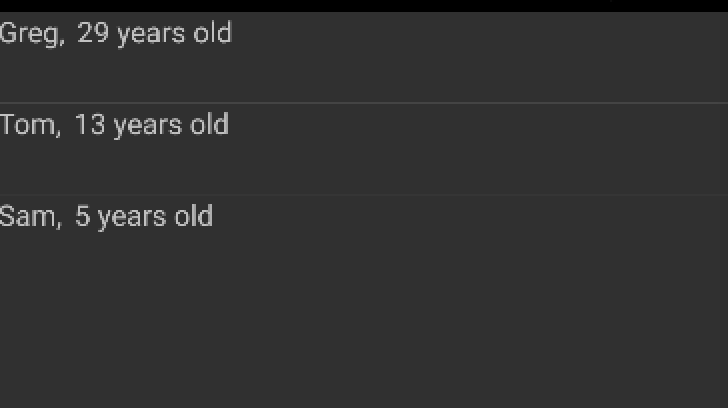
Notice that when I implemented my own ViewCell, I specified the bindings within the Cell type therefore there was no need to specify the bindings via listView.ItemTemplate.SetBinding.
Here the result:
Dynamic lists
The previous sample was using a static list in the sense that the list never changes.
If the list needs to be updated and reflected in the UI, you can make the viewmodel inherit from ViewModelBase and notify that the list has changed every time.
But if you need to support add, remove, replace or move items, there is an implementation of a collection which already implements INotifyPropertyChanged which publish an events when actions are performed on its underlying list - ObservableCollection.
If we need a list which changes and where the View needs to be updated
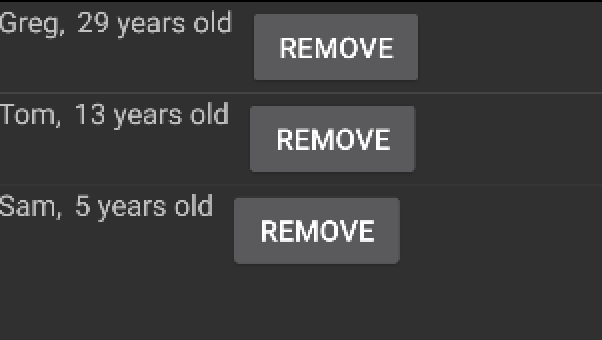
Use ObservableCollection<_> to bind a list which automatically updates the views on Add and Remove
The add will be beside the ListView and remove will be on each ViewCell.
The actions are bound using Command's, we will see next what it is.
type MyTextCell() as self =
    inherit ViewCell()

    let name = new Label()
    let age = new Label()
    let delete = new Button(Text = "Remove")
    let layout =
        let layout = new StackLayout(Orientation = StackOrientation.Horizontal)
        layout.Children.Add(name)
        layout.Children.Add(age)
        layout.Children.Add(delete)
        layout

    do
        name.SetBinding(Label.TextProperty, "Name", stringFormat = "{0},")
        age.SetBinding(Label.TextProperty, "Age", stringFormat = "{0} years old")

        delete.SetBinding(Button.CommandProperty, "Remove")
        delete.SetBinding(Button.CommandParameterProperty, ".")

        self.View <- layout

type MyPage(viewmodel: obj) as self =
    inherit ContentPage(Title = "Observable collection sample")

    let listView = new ListView(ItemTemplate = new DataTemplate(typeof<MyTextCell>))
    let btn      = new Button(Text = "Add new")

    let layout =
        let layout = new StackLayout()
        layout.Children.Add(listView)
        layout.Children.Add(btn)
        layout

    do
        self.BindingContext <- viewmodel
        listView.SetBinding(ListView.ItemsSourceProperty, "List")
        btn.SetBinding(Button.CommandProperty, "Add")
        self.Content <- layout
"." is used to bind the context itself.
We added a button to remove a person and add a new person.
For the definition of the viewodel, since we have added a Remove action on the cell itself, we will need to create a viewmodel for each cell which we’ll call PersonViewModel.
type MyPageViewModel() as self =

    let list =
        new ObservableCollection<PersonViewModel>(
            [ { Name = "Greg"; Age = 29 }
              { Name = "Tom"; Age = 13 }
              { Name = "Sam"; Age = 5 } ]
            |> List.map(fun p -> new PersonViewModel(self, p.Name, p.Age)))

    member self.List
        with get() =
            list

    member self.Add
        with get() =
            new Command(fun () -> list.Add(new PersonViewModel(self, "New person", 0)))

and PersonViewModel(parent: MyPageViewModel, name, age) =
    inherit ViewModelBase()

    let mutable name = name
    let mutable age = age

    member self.Name
        with get() = name
        and set value =
            name <- value
            base.OnPropertyChanged "Name"

    member self.Age
        with get() = age
        and set value =
            age <- value
            base.OnPropertyChanged "Name"

    member self.Remove
        with get() =
            new Command<PersonViewModel>(fun p -> parent.List.Remove p |> ignore)

    new(parent:MyPageViewModel) =
        new PersonViewModel(parent, "", 0)
Thanks to the ObservableCollection, after adding using list.Add(...) or removing using list.Remove(...), the view is directly notified, we don’t need to call OnPropertyChanged manually.
In this sample, we used Command to bind commands to the add button click event and remove button click event.
Let’s see how they can be used.
Trick: to access the list held in the parent viewmodel,
I am passing the parent viewmodel MyPageViewModel to the child viewmodels PersonViewModel.
That way I can acess the list from the child and remove item from the list.
3. Commands
A command is used to bind functions to events such as clicked events or tapped events.
Xamarin provides an implementation of ICommand which simplifies the creation of commands by taking either an action or a function with a single argument.
...In viewmodel...
member self.MyCommand
    with get() =
        new Command(fun () ->
            //do something
            ())

...In view...
btn.SetBinding(Button.CommandProperty, "MyCommand")
When btn is clicked, the function given to new Command() will be called.
It is also possible to pass an argument via CommandArgument.
...In viewmodel...
member self.MyCommand
    with get() =
        new Command<string>(fun str ->
            //do something
            ())

...In view...
btn.SetBinding(Button.CommandProperty, "MyCommand")
btn.SetBinding(Button.CommandParameterProperty, "SomeString")
The full source code is available on my GitHub - https://github.com/Kimserey/XamarinFormsBindings/blob/master/XamarinFormsBindings/XamarinFormsBindings.fs
Conclusion
Today we saw how we can implement data bindings to bind UI element properties for Label, button and lists. We also saw how we can use Commands to bind actions in response to click events. Data bindings allows us to separate the view and viewmodel. By keeping the views and viewmodels independent, the code becomes more flexible and both can be changed independently. I hope that you enjoyed reading this post as much as I enjoyed writing it. If you have any comments leave it here or hit me on Twitter @Kimserey_Lam! See you next time!
More posts you will like!
- Setup your environment to build apps with Xamarin Forms in F# - https://kimsereyblog.blogspot.co.uk/2016/05/setup-your-environment-to-build-android.html
- Transform your WebSharper web app into a Android mobile app with Xamarin.Forms WebView https://kimsereyblog.blogspot.co.uk/2016/05/transform-your-websharper-web-app-into.html

Comments
Post a Comment