Saving data with Entity Framework Core with SQLite
Saving data with Entity Framework Core with SQLite
Entity Framework is a framework abstracting away all the complexity of dealing with storage. This abstraction is also known as ORM ~ object-relational mapping.
There is a number of provider which are implementation of the storage like SQL server or MySql or also SQLite, the one we will be seeing in this post.
SQLite is a embedded database. The whole database is contained within a single .db file which makes it highly portable, so portable that it is the default database installed in mobile OS like iOS and Android. It is extremely easy to use and to maintain. It also offer a powerful implementation of SQL. Today we will see how we can make use of Entity Framework with SQLite provider in a ASP.NET Core application.
 1. Install EF and create a new DbContext
 2. Create migrations
 3. Use in ASP NET Core
1. Install EF and create a new DbContext
Start by installing the packages:
Install-Package Microsoft.EntityFrameworkCore.SQLite
Once we have installed EF Core SQLite, we will create our first DbContext:
public class PersonDbContext : DbContext
{
    public DbSet<Person> Persons { get; set; }

    protected override void OnConfiguring(DbContextOptionsBuilder optionsBuilder)
    {
        optionsBuilder.UseSqlite("Data source=persons.db");
    }
}
Also installing EF Core SQLite gives us access to the .UseSqlite extension on the DbContext builder which we can register by overriding the OnConfiguring function of the DbContext.
With our first Person model:
public class Person
{
    public int Id { get; set; }
    [Required]
    public string Name { get; set; }
}
Now that we have configured our first DbContext, what we need to do is to create the database.
2. Create migrations
While we could create our database manually, EF provides a set of tools which can be used to create migrations via the dotnet CLI.
Migrations are a big advantage of EF, in the event of us having to change the database after data have already been added, we will be in measure to use the migration to automate the process.
This way of developing ~ creating the object model, generating migrations out of the object model, creating database by running migrations ~ is also known as Code first design.
In order to generate the migration code we will start by configuring the EF tools. An example of command is:
dotnet ef migrations add InitialMigration
If we run that we will get the error No executable found matching the command dotnet-ef. What we need is to configure the project to use dotnet ef.
Start by adding the EF design library:
Microsoft.EntityFrameworkCore.Design
The library is needed to use the tools otherwise it will throw an exception System.IO.FileNotFoundException: Could not load file or assembly 'Microsoft.EntityFrameworkCore.Design, Culture=neutral, PublicKeyToken=null'.
Then add the EF tools as a DotNetCliToolReference in the .csproj as followed to make the dotnet ef command line available:
<ItemGroup>
    <DotNetCliToolReference Include="Microsoft.EntityFrameworkCore.Tools.DotNet" Version="1.0.0" />
</ItemGroup>
Now re-run the following command to create the first migration:
dotnet ef migrations add InitialMigration
And we should have the newly created /Migrations folder with a migration file.
Then run the update command to create the database:
dotnet ef database update
The database should be located in the output directory usually under the /bin directory.
If we need to modify our database, we can add a new migration and rerun the database update.
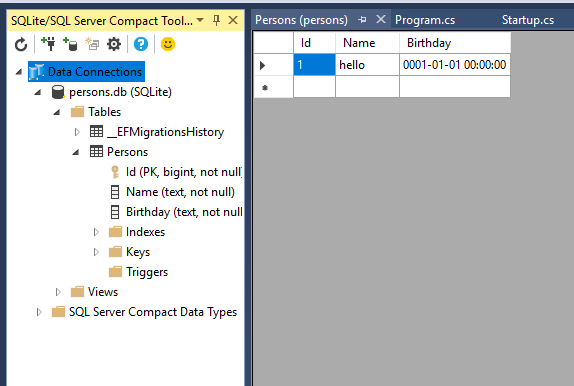
In order to visualize it easily, we can install the VS extension to open SQLite databases:
SQLite / SQL Server Compact Toolbox
EF core CLI command list can be found in the official EF core doc https://docs.microsoft.com/en-us/ef/core/miscellaneous/cli/dotnet.
3. Use in ASP NET Core
Now that we have our database and can access it via the DbContext, we can use it in our controller to save and retrieve data.
In order to have the DbContext injected via dependency injection, we need to register the DbContext in the services configuration in the Startup.cs:
public void ConfigureServices(IServiceCollection services)
{
    services.AddDbContext<PersonDbContext>();
    services.AddMvc();
}
This then allow us to inject the DbContext on the controller endpoint and use it:
[HttpPost("/test")]
public IActionResult Test([FromServices]PersonDbContext context, [FromForm]string name)
{
    context.Add(new Person {
        Name = name
    });
    context.SaveChanges();
    return Ok();
}
After accessing the endpoint, we should be able to see the value added to our database using the SQLite compact toolbox:
Conclusion
Today we saw how to install and configure Entity Framework with a SQLite storage. Entity Framework makes it very handy to work in OOP and making the solution storage agnostic. SQLite as a backup storage makes the solution very portable and easy to maintain thanks to its small size and its embedded nature. Hope you enjoyed this post as much as I enjoyed writing it! If you have any question, leave it here or hit me on Twitter @Kimserey_Lam. See you next time!

Comments
Post a Comment