Docker compose an ASP NET Core application with SQL Server
Docker compose an ASP NET Core application with SQL Server
Last week we saw how we could install and run an ASP NET Core application in a container, we saw how Visual Studio uses docker-compose to setup our services. Today we will see how we can use compose to setup a cluster composed by an ASP NET Core application container with a SQL Server container and how we can place in a third party process. This post will be composed by three parts:
- Setup SQL Server container on its own
- Setup an ASP NET Core application with SQL Server
- Setup a Flyway as migration tool
1. Setup SQL Server container on its own
If you haven’t installed Docker, follow my previous blog post.
The SQL Server Docker image can be downloaded from mcr.microsoft.com/mssql/server:2017-latest. So first we can start by running the container:
docker run -e "ACCEPT_EULA=Y" -e "SA_PASSWORD=MyPassword001" -p 1433:1433 --name sqlserver-test -d mcr.microsoft.com/mssql/server:2017-latest
-especifies an environment variable, here we specify password and acceptance of EULA (end user license agreement),-pspecifies the port to forward so that we can connect from the host (our local machine),--namespecifies the name used to identify the container - this is useful to start/stop/delete the container,-dspecifies that we want to start a detached container (runs in background).
Once we run this command, we can check that the container is running:
> docker container ls
CONTAINER ID        IMAGE                                        COMMAND                  CREATED             STATUS              PORTS                    NAMES
3ac875159441        mcr.microsoft.com/mssql/server:2017-latest   "/opt/mssql/bin/sqls…"   6 seconds ago       Up 5 seconds        0.0.0.0:1433->1433/tcp   sqlserver-test
If you face Error starting userland proxy: mkdir /port/tcp:0.0.0.0:1433:tcp:172.17.0.2:1433: input/output error, restart Docker.
Once SQL Server is running, we can get a bash prompt by using the following command:
> docker container exec -it sqlserver-test bash
root@3ac875159441:/#
Then we can enter the interactive SQL command prompt by using the user SA and the password we specified:
root@3ac875159441:/# /opt/mssql-tools/bin/sqlcmd -S localhost -U SA -P MyPassword001
1>
Next we can execute a SQL command:
1> USE master
2> GO
Changed database context to 'master'.
Then insert data into it:
1> CREATE TABLE person (id INT, name VARCHAR(255), primary key (id));
2> GO

1> insert into person values (1, 'kim');
2> GO
(1 rows affected)

1> insert into person values (2, 'tom');
2> GO
(1 rows affected)
Lastely query from it:
1> SELECT * from person
2> GO
id   name
  1  kim
  2  tom
(2 rows affected)
We endup with a fully working SQL Server running in a container. If we were to use SQL Server Management studio (SSMS), we would be able to connect to localhost,1433 and browse our databse.
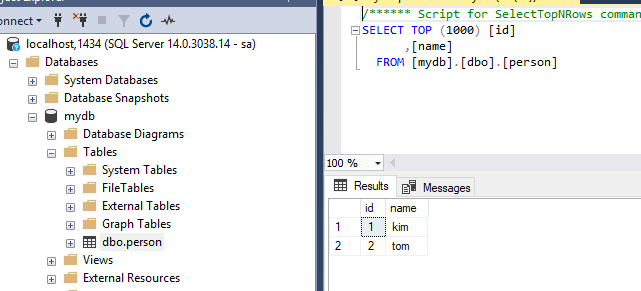
Side note to avoid confusion: in the picture I am running the server on 1434
Now that we know how SQL Server works, we can delete this container which will permanently destroy all data in the database.
docker container stop sqlserver-test
docker container rm sqlserver-test
2. Setup an ASP NET Core application with SQL Server
Now that we know how to setup SQL Server, we can add it into our compose configuration. We start first by creating a simple ASP NET Core WebApplication and enabling Docker.
The default enabling of Docker gives us the following compose in the dccproj (Docker compose project):
services:
  webapplication1:
    build:
      context: .
      dockerfile: WebApplication1/Dockerfile
Running this projects start the application. We can then add the SQL Server image which we tested in 1) by adding it into the compose configuration and making it as a dependency of the WebApplication:
services:
  webapplication1:
    build:
      context: .
      dockerfile: WebApplication1/Dockerfile
    depends_on:
      - db
  db:
    image: "mcr.microsoft.com/mssql/server"
    environment:
        SA_PASSWORD: "MyPassword001"
        ACCEPT_EULA: "Y"
    ports:
      - "1433:1433"
The environment variable which we use to pass through -e are now set in environment.
Next we can setup a simple service to query the database:
public interface IPersonRepository
{
    IEnumerable<string> GetNames();
}
With its implementation:
public class PersonRepository : IPersonRepository
{
    private IDbConnection _connection;

    public PersonRepository(IDbConnection connection)
    {
        _connection = connection;
    }

    public IEnumerable<string> GetNames()
    {
        IEnumerable<string> names = Enumerable.Empty<string>();
        return _connection.Query<string>("SELECT name FROM Person");
    }
}
And we instantiate the DbConnection in Startup.cs:
public class Startup
{
    public IConfiguration Configuration { get; }

    public Startup(IConfiguration configuration)
    {
        Configuration = configuration;
    }

    public void ConfigureServices(IServiceCollection services)
    {
        services.AddTransient<IDbConnection>(sp => new SqlConnection("Server=db;Database=master;User=sa;Password=MyPassword001;"));
        services.AddTransient<IPersonRepository, PersonRepository>();
        services.AddMvc().SetCompatibilityVersion(CompatibilityVersion.Version_2_1);
    }

    public void Configure(IApplicationBuilder app, IHostingEnvironment env)
    {
        if (env.IsDevelopment())
        {
            app.UseDeveloperExceptionPage();
        }

        app.UseMvc();
    }
}
Notice the connection string Server=db;Database=master;User=sa;Password=MyPassword001;, the database host is accessible via db which is the name specified for the service in the compose configuration.
Lastly we call it from the controller:
[ApiController]
[Route("api/persons")]
public class PersonsController : ControllerBase
{
    [HttpGet]
    public ActionResult<string[]> Get([FromServices] IPersonRepository repository)
    {
        return repository.GetNames().ToArray();
    }
}
By running the docker project, we now have the two containers running as a cluster:
$ docker container ls
CONTAINER ID        IMAGE                            COMMAND                  CREATED             STATUS              PORTS                    NAMES
4bf1dab248b9        mcr.microsoft.com/mssql/server   "/opt/mssql/bin/sqls…"   9 seconds ago       Up 7 seconds        0.0.0.0:1433->1433/tcp   dockercompose17122146709022121950_db_1
3a920302b5b4        webapplication1:dev              "tail -f /dev/null"      22 seconds ago      Up 18 seconds       0.0.0.0:5500->80/tcp     dockercompose17122146709022121950_webapplication1_1
But if we hit the endpoint, we will get an exception telling us that person is not valid System.Data.SqlClient.SqlException: 'Invalid object name 'Person'.
To fix that we will be creating our first migration.
3. Setup a Flyway as migration tool
The error that we see in 2) indicates that Person in our SQL query SELECT name FROM Person is not valid. This is due to the fact that the table does not exists. In order to bootstrap our database with the right table when the application start, we can run migrations. If we were using an ORM like Entity Framework Core, we could use the dotnet migration tool which would deduce the migrations from the DbContext. But in our simple example, we only have a simple query therefore don’t need an ORM.
3.1 First migration
An alternative solution for migration is Flyway. Flyway allows to write SQL queries which will serve as migration stages. To run it locally, download it from Flyway website and use the command line to migrate your database:
/path/to/flyway migrate -user=sa -password=MyPassword001 -url="jdbc:sqlserver://[url-of-db]:1433;databaseName=[db-name]" -locations="filesystem:[/path/to/migrations]"
For example, we want to create the Person table therefore our migration will be called V1__Create_person_table.sql:
create table PERSON (
    ID int not null,
    NAME varchar(100) not null
);

insert into PERSON (ID, NAME) values (1, 'Kim');
V1__Migrations.sql is a convention used by Flyway to detect the type of migration file, Update/Undo/Repeatable. More information on Flyway documentation.
The migration that we have created will create the PERSON table and insert Kim inside the table.
Let’s try it on a SQL Server container by following 1):
We start first by starting the container:
$ docker run -e "ACCEPT_EULA=Y" -e "SA_PASSWORD=MyPassword001" -p 1433:1433 --name sqlserver-test -d mcr.microsoft.com/mssql/server:2017-latest

$ docker container ls
CONTAINER ID        IMAGE                                        COMMAND                  CREATED              STATUS              PORTS                    NAMES
a3ec23b3dea3        mcr.microsoft.com/mssql/server:2017-latest   "/opt/mssql/bin/sqls…"   About a minute ago   Up About a minute   0.0.0.0:1433->1433/tcp   sqlserver-test
We then use Flyway to apply the migration we created:
$ cd /where/you/downloaded/flyway

$ flyway migrate -user=sa -password=MyPassword001 -url="jdbc:sqlserver://localhost:1433;databaseName=master" -locations="filesystem:."

Flyway Community Edition 5.1.4 by Boxfuse

Database: jdbc:sqlserver://localhost:1433;sslProtocol=TLS;jaasConfigurationName=SQLJDBCDriver;statementPoolingCacheSize=0;serverPreparedStatementDiscardThreshold=10;enablePrepareOnFirstPreparedStatementCall=false;fips=false;socketTimeout=0;authentication=NotSpecified;authenticationScheme=nativeAuthentication;xopenStates=false;sendTimeAsDatetime=true;trustStoreType=JKS;trustServerCertificate=false;TransparentNetworkIPResolution=true;serverNameAsACE=false;sendStringParametersAsUnicode=true;selectMethod=direct;responseBuffering=adaptive;queryTimeout=-1;packetSize=8000;multiSubnetFailover=false;loginTimeout=15;lockTimeout=-1;lastUpdateCount=true;encrypt=false;disableStatementPooling=true;databaseName=master;columnEncryptionSetting=Disabled;applicationName=Microsoft JDBC Driver for SQL Server;applicationIntent=readwrite; (Microsoft SQL Server 14.0)
Successfully validated 1 migration (execution time 00:00.041s)
Creating Schema History table: [master].[dbo].[flyway_schema_history]
Current version of schema [dbo]: << Empty Schema >>
Migrating schema [dbo] to version 1 - Create person table
Successfully applied 1 migration to schema [dbo] (execution time 00:00.142s)
We assumed that the migration file was in the same folder as Flyway executable hence -locations="filesystem:.". The url specified is localhost as we forwarding all connections to 1433 from the host to the container 0.0.0.0:1433->1433 as we can see with docker container ls in the PORTS column.
We then verify that our migration has run properly by running the SELECT query from the SQL command prompt as we did to create the database.
$ docker container exec -it sqlserver-test bash
root@a3ec23b3dea3:/# /opt/mssql-tools/bin/sqlcmd -S localhost -U SA -P MyPassword001
1> SELECT * FROM PERSON;
2> GO
ID          NAME
----------- -------------------------
          1 Kim

(1 rows affected)
Flyway manages its migration by adding a flyway_schema_history table in the database. After running this first migration, we can see the content of the table being the following:
installed_rank  version description type    script  checksum    installed_by    installed_on    execution_time  success
1   1   Create person table SQL V1__Create_person_table.sql -829593813  sa  2018-10-03 08:34:58.650 10  1
Great! We now have started a SQL Server container and ran migration on it. Now that we know how the migrations work, we can move on to add it as a compose step.
3.2 Run Flyway as a container
Start first by cleaning the Docker project which will teardown the cluster and clean up the container created in 3.1) with docker container stop/rm sqlserver-test.
We want to be able to run migration as we bootstrap our cluster. Therefore the migrations need to be included in the composition and be ran after the database container start and before the application starts. In order to do that, we add a Dockerfile describing how the migrations need to be ran. Before that let take a look at our folder structure:
- MySolution.sln
- docker-compose.dcproj
- ...other docker-compose files

- /Migrations/
- /Migrations/Dockerfile
- /Migrations/sql/
- /Migrations/sql/V1__Create_person_table.sql

- /MyWebProject/
- /MyWebProject/MyWebProject.csproj
- /MyWebProject/Dockerfile
- ...other MyWebProject files
And the content of our Dockerfile for our migration:
FROM boxfuse/flyway
WORKDIR /src
COPY Migrations/sql .
ENTRYPOINT flyway migrate -user=$SA_USER -password=$SA_PASSWORD -url="jdbc:sqlserver://db:1433;databaseName=master" -locations="filesystem:."
We start from the Flyway image boxfuse/flyway and set the working directory as /src. We then copy the migrations from Migrations/sql into the current directory by specifying . (dot).
Here we are using the shell form of ENTRYPOINT which allows us to execute a command containing environment variables $SA_USER and $SA_PASSWORD. If we were using the exec form, we wouldn’t be able to pass environment variables as it would take the variable token literally. More info in Docker documentation.
Because we copied the migrations files under the current directory, the location is ., -locations="filesystem:.".
Finally we modify our compose confiugration to include the migration:
services:
  webapplication1:
    build:
      context: .
      dockerfile: WebApplication1/Dockerfile
    depends_on:
      - db
      - migration
  migration:
    build:
      context: .
      dockerfile: Migrations/Dockerfile
    environment:
        SA_USER: "sa"
        SA_PASSWORD: "MyPassword001"
    depends_on:
      - db
  db:
    image: "mcr.microsoft.com/mssql/server"
    environment:
        SA_PASSWORD: "MyPassword001"
        ACCEPT_EULA: "Y"
    ports:
      - "1433:1433"
Once the container runs, we can then check that the migration ran properly by using docker logs:
$ docker logs dockercompose17122146709022121950_migration_1
Flyway Community Edition 5.1.4 by Boxfuse

Database: jdbc:sqlserver://db:1433;sslProtocol=TLS;jaasConfigurationName=SQLJDBCDriver;statementPoolingCacheSize=0;serverPreparedStatementDiscardThreshold=10;enablePrepareOnFirstPreparedStatementCall=false;fips=false;socketTimeout=0;authentication=NotSpecified;authenticationScheme=nativeAuthentication;xopenStates=false;sendTimeAsDatetime=true;trustStoreType=JKS;trustServerCertificate=false;TransparentNetworkIPResolution=true;serverNameAsACE=false;sendStringParametersAsUnicode=true;selectMethod=direct;responseBuffering=adaptive;queryTimeout=-1;packetSize=8000;multiSubnetFailover=false;loginTimeout=15;lockTimeout=-1;lastUpdateCount=true;encrypt=false;disableStatementPooling=true;databaseName=master;columnEncryptionSetting=Disabled;applicationName=Microsoft JDBC Driver for SQL Server;applicationIntent=readwrite; (Microsoft SQL Server 14.0)
Successfully validated 1 migrations (execution time 00:00.026s)
Creating Schema History table: [master].[dbo].[flyway_schema_history]
Current version of schema [dbo]: << Empty Schema >>
Migrating schema [dbo] to version 1 - Create person table
Successfully applied 1 migrations to schema [dbo] (execution time 00:00.395s)
And that concludes today’s post! When we run our application by running the Docker Compose project, we can hit http://localhost:5000/api/persons and get the values we inserted via the migrations!
Conclusion
Today we saw how we could compose a Docker cluster with an ASP NET Core application, a SQL Server container and a migration container running at each startup of the cluster. We started by looking at how we could run SQL Server container on its own and saw how it worked and how we could access a SQL command prompt to interact with it. We then moved on to see how we could make it part of a cluster composed by an ASP NET Core application and the SQL Server container itself and lastly we completed this post by looking into creating a migration container using Flyway which would run at startup of the cluster. Hope you liked this post, see you next time!
Comments
Post a Comment