From idea to product with WebSharper in FSharp
From idea to product with WebSharper in FSharp
From time to time I get asked, Why do you use WebSharper?
A legitimate question as from the abundance of libraries, tools and frameworks available,
one might think that WebSharper + F# is just another hippie stack.
My answer to this question is:
What matters isn’t the tools that you use but the products that you build with those tools
WebSharper allows me to take my F# logic and place it into a web application and give me a reactive framework - UI.Next - to write shorter and more understandable code. That is the reason why I use it.
So today, in order to backup what I just said above, I would like to share with you a small tool that I built few days ago.
http://www.kimsereylam.com/ResourcesSplit/
In case you are interested in the tool, it is for Marvel Champions of Contest, the mobile game. To stay generic, here’s the problem:
An alliance is composed of players. Each player has two characteristics: level and continent where they play.

Players must be distributed into 3 groups based on the following rules:

 1. All levels must be distributed as eavenly as possible. Important to have a balanced group.
 2. Each group must contain players of as many continents as possible. Important to have a group operating 24h per day,
I thought that the whole process was interesting so I would like to share with you:
- The idea
- Use F# scripts to test your algorithm
- Create the WebSharper project
- Push to gitbub and make gh-pages
1. The idea
Few days ago, I had the need to have a way to distribute players in three groups for a game. Before that, it was done manually, Team captains will decide of the groups based on the level of players and continent were they stay. A good group would be a group where the levels of the players compensate each other and the continent repartition is diversified.
This scenario was clearly screaming for an algorithm as it was well defined and the steps were always done in the same order.
So the algorithm was born:
Given a resource:
- Compute the Level score of each group and take lowests
  |- for each lowests groups
  |   - Computer the number of players per continent
  |
  |- find the lowest group with the less player in resource continent
      - Place resource
2. Use F# scripts to test your algorithm
Having the algorithm ready, the next step was to test whether it was sound.
The fastest way is to script it so I opened a .FSX file and started to write the algorithm.
I defined the models first:
type Resource =
    { Level: Level
      Continent: Continent }

and Level =
    | Good
    | Normal
    | Poor

and Continent =
    | Asia
    | Europe
    | Pacific

type Groups = {
    A: Resource list
    B: Resource list
    C: Resource list
}
And then I scripted the algorithm stated in (1).
type Groups with
    static member Place (resource: Resource) (x: Groups) =
        let sumLevel =
            List.sumBy (fun r ->
                match r.Level with
                | Good -> 3
                | Normal -> 2
                | Poor -> 1)

        let countContinent =
            List.filter (fun r -> r.Continent = resource.Continent) >> List.length

        let selectGroup =
            [(x.A, "A"); (x.B, "B"); (x.C, "C") ]
            |> List.groupBy (fst >> sumLevel)
            |> List.minBy fst
            |> snd
            |> List.minBy (fst >> countContinent)
            |> snd

        match selectGroup with
        | "A" -> { x with A = resource :: x.A }
        | "B" -> { x with B = resource :: x.B }
        | _   -> { x with C = resource :: x.C }
Place function places a resource into existing groups.
The algorithm piece is selectGroup which selects the group where the resource should be placed.
let selectGroup =

    // Create pairs of (group, label)
    [(x.A, "A"); (x.B, "B"); (x.C, "C") ]

    // Group all levels with the same score together
    |> List.groupBy (fst >> sumLevel)

    // Select the lowest score group
    |> List.minBy fst

    // Since groupBy returned (key, group), I take the groups only
    |> snd

    // Select the group with the lowest amount of players in the same continent as target resource
    |> List.minBy (fst >> countContinent)

    // Select the group label
    |> snd
After that I got this algorithm ready, I could directly test it in FSI.
let resources =
    [ { Level = Good; Continent = Asia }
      { Level = Good; Continent = Asia }
      { Level = Good; Continent = Pacific }
      { Level = Good; Continent = Pacific }
      { Level = Normal; Continent = Asia }
      { Level = Normal; Continent = Pacific }
      { Level = Poor; Continent = Asia }
      { Level = Poor; Continent = Asia } ]

(Groups.Empty, resources)
||> List.fold (fun groups resource -> Groups.Place resource groups)
Just by highliting the code and executing to FSI, I had a direct answer whether this algorithm was sound or not. After making sure that it was sound, the next step was to make it available for normal users. And the fastest way to make something available is to put it on the internet.
So I went ahead and created a WebSharper project.
The code can be found here - https://github.com/Kimserey/ResourcesSplit/blob/master/ResourcesSplit.Tests/Script.fsx
3. Create the WebSharper project
3.1 Domain
To start with, I did the following:
- Used the Single page application project template from WebSharper
- Referenced WebSharper.UI.Next from Nuget
- Pasted my code defined in (2) in the
Client.fs
If you never created a web app with WebSharper before, you can refer to my tutorials and specifically on the SPA primer with WebSharper and WebSharper.UI.Next https://kimsereyblog.blogspot.co.uk/2015/08/single-page-app-with-websharper-uinext.html
After I pasted my code, I enhanced it just a little to add some functions to be used for the UI, like matching levels to colours.
[<JavaScript>]
module Domain =

    type Resource =
        { Name: string
          Level: Level
          Continent: Continent }
        with
            static member Green name =
                { Name = name
                  Level = Green
                  Continent = Asia }

            static member Yellow name =
                { Name = name
                  Level = Yellow
                  Continent = Asia }

            static member Red name =
                { Name = name
                  Level = Red
                  Continent = Asia }

    and Level =
        | Green
        | Yellow
        | Red
        with
            override x.ToString() = sprintf "%A" x
            static member All = [ Green; Yellow; Red ]
            static member Color x =
                match x with
                | Green -> "#95ea95"
                | Yellow -> "#f9fb83"
                | Red -> "#ffa8a8"

    and Continent =
        | Asia
        | Europe
        | Pacific
        with
            override x.ToString() = sprintf "%A" x
            static member All = [ Asia; Europe; Pacific ]

    type Groups = {
        A: Resource list
        B: Resource list
        C: Resource list
    } with
        static member Empty =
            { A = []; B = []; C = [] }

        static member Place (resource: Resource) (x: Groups) =
            let sumLevel =
                List.sumBy (fun r -> match r.Level with Green -> 3 | Yellow -> 2 | Red -> 1)

            let countContinent =
                List.filter (fun r -> r.Continent = resource.Continent) >> List.length

            let selectGroup =
                [(x.A, "A"); (x.B, "B"); (x.C, "C") ]
                |> List.groupBy (fst >> sumLevel)
                |> List.minBy fst
                |> snd
                |> List.minBy (fst >> countContinent)
                |> snd

            match selectGroup with
            | "A" -> { x with A = resource :: x.A }
            | "B" -> { x with B = resource :: x.B }
            | _   -> { x with C = resource :: x.C }
It’s pretty much the same apart from the Name member added to the resource.
3.2 UI
Now what I needed to do was to provide a functional UI.
- a list of resources where level and continent was configurable
- a table containing all the groups and the players in each group with colours to make it visually more understandable
The best way to handle lists in UI.Next is to use ListModel and LensInto.
I made an tutorial on ListModel - https://kimsereyblog.blogspot.co.uk/2016/03/var-view-lens-listmodel-in-uinext.html - if you never seen it before, read the tutorial to understand its power!
Two components were needed, resources and the result so I placed the two sections on my index.html:
<body>
    <h2>Resources</h2>
    <div id="resources"></div>
    <h2>Result</h2>
    <div id="result"></div>
</body>
And used Doc.RunById "resources" and Doc.RunById "result" to insert my elements.
After that I defined the resources variable as followed:
let resources =
    ListModel.Create (fun r -> r.Name)
        [ Resource.Green "Kim"
          Resource.Yellow "Tom"
          Resource.Red "Sam" ]
This creates an observable list where each element can be lens into.
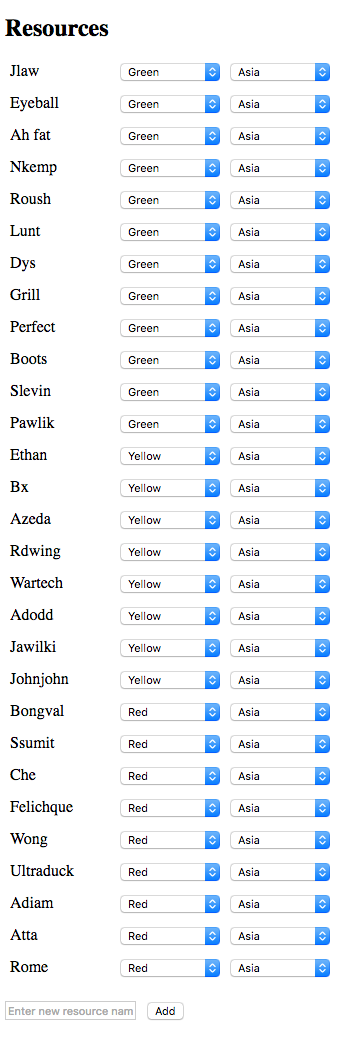
For the resources display, I observed the list and for each element of the list, I created an element composed by the name of the resource and two dropdowns for the level and continent.
The interesting part is that the dropdowns are directly linked to the resources in the list.
Every changes on the resources will trigger a refresh of all the functions bound to the view of resources.
divAttr
    [ attr.style "margin: 15px 0" ]
    [ resources.View
        |> Doc.BindSeqCached (fun resource ->
        divAttr
            [ attr.style "height: 2em;" ]
            [ divAttr [ attr.style "width: 100px; display: inline-block; margin: 0 5px;" ] [ text resource.Name ]
                Doc.Select [ attr.style "width: 100px; margin: 0 5px;" ] string Level.All (resources.LensInto (fun r -> r.Level) (fun r l -> { r with Level = l }) resource.Name)
                Doc.Select [ attr.style "width: 100px; margin: 0 5px;" ] string Continent.All (resources.LensInto (fun r -> r.Continent) (fun r c -> { r with Continent = c }) resource.Name)
        ])
        divAttr
          []
          [ Doc.Input [ attr.placeholder "Enter new resource name"; attr.style "margin: 1em 1em 1em 0;" ] newName :> Doc
            Doc.Button "Add" [] (fun () -> resources.Add (Resource.Green newName.Value)) ] :> Doc ]
|> Doc.RunById "resources"
We then get the following result:
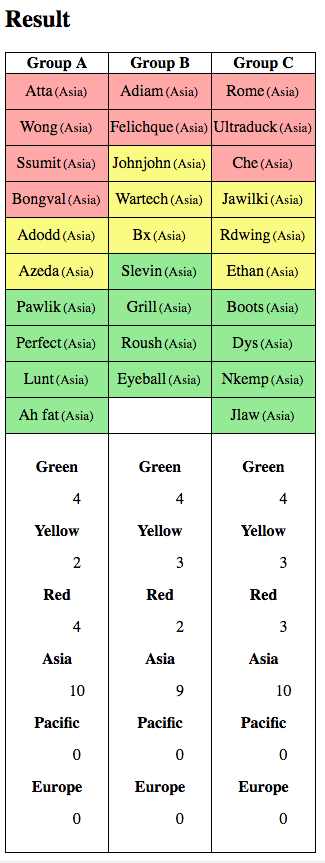
And finally the result is done by observing the view of resources and creating a table with dls to display some stats on the group itself.
resources.View
|> Doc.BindView (fun resources ->
    let groups =
        (Groups.Empty, resources |> Seq.toList)
        ||> List.fold (fun groups resource -> Groups.Place resource groups)

    let max =
        [ groups.A; groups.B; groups.C ] |> List.map List.length |> List.max

    let tableRow =
        [ for i in [0..max-1] do yield [ List.tryItem i groups.A; List.tryItem i groups.B; List.tryItem i groups.C ] ]

    let stats resources =
        dl [ dt [ text "Green" ]
                dd [ text (resources |> List.filter (fun r -> r.Level = Green) |> List.length |> string) ]
                dt [ text "Yellow" ]
                dd [ text (resources |> List.filter (fun r -> r.Level = Yellow) |> List.length |> string) ]
                dt [ text "Red" ]
                dd [ text (resources |> List.filter (fun r -> r.Level = Red) |> List.length |> string) ]
                dt [ text "Asia" ]
                dd [ text (resources |> List.filter (fun r -> r.Continent = Asia) |> List.length |> string) ]
                dt [ text "Pacific" ]
                dd [ text (resources |> List.filter (fun r -> r.Continent = Pacific) |> List.length |> string) ]
                dt [ text "Europe" ]
                dd [ text (resources |> List.filter (fun r -> r.Continent = Europe) |> List.length |> string) ] ]

    let table =
        table
            [ yield tr [ th [ text "Group A" ]; th [ text "Group B" ]; th [ text "Group C" ] ] :> Doc
                yield! (tableRow |> List.map(fun row -> tr (row |> List.map (function Some r -> tdAttr [ attr.style ("background-color:" + Level.Color r.Level) ] [ text r.Name; spanAttr [ attr.``class`` "small-text" ] [ text (sprintf "(%s)" (string r.Continent)) ] ] | None -> td []) |> Seq.cast)) |> Seq.cast)
                yield tr [ td [ stats groups.A ]; td [ stats groups.B ]; td [ stats groups.C ] ] :> Doc ]

    table)
|> Doc.RunById "result"
We then see the following result:
And we are done with the web application.
Now we have a ready to use application which solves a real problem. Distribution of resources into groups based on level and continent.
Next step is to make it available.
4. Push and host your web app on GitHub
The best way to make something available to everyone is to have it available on the internet. GitHub is one of the way you can provide access to static pages for free. In this application, there is no server side, only the client browser is needed to execute the JS. Also this is not meant to be an enterprise application used by million of people. It might not even be used by more than ten persons but it is useful for persons I know and this is enough for me to produce it. Therefore if you are in the same situation, GitHub is a viaible solution to push your site. Also blogs can be hosted on GitHub pretty well.
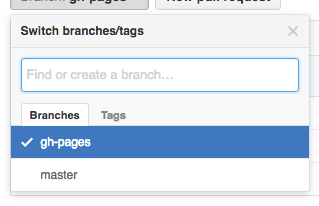
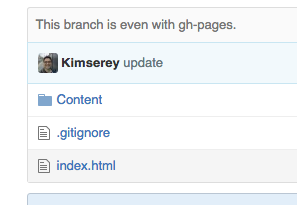
To host on GitHub, you just need to create a repository and create a branch gh-pages and push your \Content and index.html to gh-pages.
After that the index.html page will be accessible on the url http://{your name}.github.io/{repository name}.
For example, my repository is called ResourcesSplit so the page is available at http://kimserey.github.io/ResourcesSplit/.
I also added my own domain name www.kimsereylam.com, so the page redirect to http://www.kimsereylam.com/ResourcesSplit/
And there you go, the application is now available for everyone who has internet to use!
Conclusion
I wrote this post to show my process from taking an idea, fiddling with the algorithm via scripts and finally putting it in a user friendly application.
It took three hours to transform the idea to a tool available for the whole world and using only free resources.
I hope this showed how WebSharper can be used to bring idea to life quickly and also that it demonstrated the power of WebSharper.UI.Next to build reactive UI easily.
Hope you enjoyed reading this post as much as I enjoyed writing it. If you have any questions, leave it here or hit me on Twitter @Kimserey_Lam! See you next time!
Resources
- The tool: http://www.kimsereylam.com/ResourcesSplit/
- The source code: https://github.com/Kimserey/ResourcesSplit
- Tutorial on Var, View, Lens, ListModel in UI.Next: https://kimsereyblog.blogspot.co.uk/2016/03/var-view-lens-listmodel-in-uinext.html
- Tutorial on Single page application with WebSharper: https://kimsereyblog.blogspot.co.uk/2015/08/single-page-app-with-websharper-uinext.html
- Tutorial on Quick prototype with WebSharper: https://kimsereyblog.blogspot.co.uk/2016/03/prototyping-web-app-made-easy-with.html

Comments
Post a Comment