How to setup a nice output folder for WebSharper projects
How to setup a nice output folder for WebSharper projects
There are part of software development which aren’t very exciting. Setting up output directories is one of them. But we have to go through it because having a well defined output structure helps tremendously when time comes to deploy and publish an application.
When using the default template from WebSharper, it could be confusing how and where binaries goes when build the application.
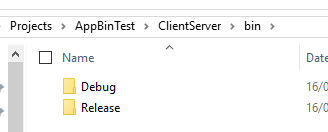
In fact choosing between Debug and Release make no difference, it all goes under the \bin folder.
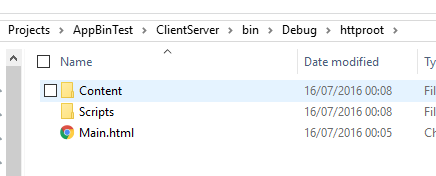
Also, the files Scripts and Content generated by WebSharper all goes on a folder in the project directory Scripts and Content folders for site projects (client-server) and Content for bundle project (spa) regardless of whether Debug or Release is chosen.
But it doesn’t have to be this way, it is possible to configure your own output folder.
How do I set my own output folder for the WebSharper generated files and binaries?
I will show you how to setup your output folder for:
- a selfhosted client-server app
- a single page application
1. Setup output folder for a OWIN selfhosted client-server app
A OWIN selfhosted client-server app contains a server part and a client part. Therefore the server parts needs to have access to the binaries and have access to the folder where the static resources are located in order to serve those files via its endpoints.
Starting from the default selfhosted template, we can see the following
[<EntryPoint>]
let Main args =
    let rootDirectory, url =
        match args with
        | [| rootDirectory; url |] -> rootDirectory, url
        | [| url |] -> "..", url
        | [| |] -> "..", "http://localhost:9000/"
        | _ -> eprintfn "Usage: OutputFolderIssue ROOT_DIRECTORY URL"; exit 1

    use server = WebApp.Start(url, fun appB ->
        appB.UseStaticFiles(
                StaticFileOptions(
                    FileSystem = PhysicalFileSystem(rootDirectory)))
            .UseSitelet(rootDirectory, Site.Main)
        |> ignore)
    stdout.WriteLine("Serving {0}", url)
    stdin.ReadLine() |> ignore
    0
This code is the entrypoint of the application which start a webserver and serves the sitelet Site.Main.
The rootDirectory is the directory where the statis files are located.
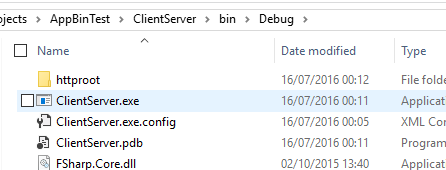
If you build this project, you will see that all the binaries get placed under \bin which is where the .exe runs.
The sitelet needs to know where the static files are which is why the rootDirectory is set to .. (one level above, where the \Scripts and \Content are generated).
You can also observe an empty Debug folder, no matter which configuration Debug or Release setting is used, the binaries are overwritten and the Scripts and Content are overwritten.
So let’s see how we can setup our own binaries output and scripts\content output.
1.1 Set the bin directory output
Most of the build configurations are setup in the fsproj file.
<PropertyGroup Condition="'$(Configuration)|$(Platform)'=='Debug|AnyCPU'">
    <DebugSymbols>true</DebugSymbols>
    <DebugType>full</DebugType>
    <Optimize>false</Optimize>
    <Tailcalls>false</Tailcalls>
    <OutputPath>bin</OutputPath>
<DefineConstants>DEBUG;TRACE</DefineConstants>
</PropertyGroup>
<PropertyGroup Condition="'$(Configuration)|$(Platform)'=='Release|AnyCPU'">
    <DebugType>pdbonly</DebugType>
    <Optimize>true</Optimize>
    <Tailcalls>true</Tailcalls>
    <OutputPath>bin</OutputPath>
    <DefineConstants>TRACE</DefineConstants>
</PropertyGroup>
Visual Studio won’t allow to open the fsproj unless you unload the project first.
If you open the fsproj, you will find a part where the two property groups above are defined.
Having this two groups mean the properties in the groups will be available only when the Condition is met.
You can see that both Debug and Release have a <OutputPath>bin</OutputPath>.
Let’s change it to bin\Debug and bin\Release.
<PropertyGroup Condition="'$(Configuration)|$(Platform)'=='Debug|AnyCPU'">
    <DebugSymbols>true</DebugSymbols>
    <DebugType>full</DebugType>
    <Optimize>false</Optimize>
    <Tailcalls>false</Tailcalls>
    <OutputPath>bin\Debug</OutputPath>
    <DefineConstants>DEBUG;TRACE</DefineConstants>
</PropertyGroup>
<PropertyGroup Condition="'$(Configuration)|$(Platform)'=='Release|AnyCPU'">
    <DebugType>pdbonly</DebugType>
    <Optimize>true</Optimize>
    <Tailcalls>true</Tailcalls>
    <OutputPath>bin\Release</OutputPath>
    <DefineConstants>TRACE</DefineConstants>
</PropertyGroup>
Changing this has the effect of putting binaries into separate folders - bin\Debug when the configuration is Debug - AnyCPI and bin\Release when the configuration is Release - AnyCPU, when building the project.
Next we need to specify to the OWIN middleware where are binaries located, if we omit this step, the application will not work.
let binDir = "."

appB.UseStaticFiles(StaticFileOptions(FileSystem = PhysicalFileSystem(rootDirectory)))
    .UseSitelet(rootDirectory, Site.Main, binDir)
We simply pass "." as the directory where the .exe is located is the same directory where all the dll's are located.
1.2 Set the Scripts and Content output
By default, all the scripts and content generated by WebSharper get placed in Scripts and Content no matter which configuration we are in.
There might be instances where you would want to keep separate Scripts and Content depending on the build configuration chosen.
In order to set your own root directory, open the fsproj and find the following tag:
<WebProjectOutputDir>...</WebProjectOutputDir>
This tag defines where the Scripts folder and Content folder should be created. By default they are placed in the project folder $(MSBuildThisFileDirectory).
To keep the static files separated from the binaries, we will place both folders into a folder called httproot which will be served by the server.
<WebProjectOutputDir>$(OutputPath)/httproot</WebProjectOutputDir>
By placing the WebProjectOutputDir after the PropertyGroup defined earlier, we can use $(OutputPath) to select our bin folder to place the WebSharper generated files.
Since we changed the root folder to be httproot, we can now simplified the OWIN middleware call by passing httproot instead of ..\\...
Here is the full code modified:
[<EntryPoint>]
let Main args =
    let rootDirectory = "httproot"

    let url =
        match args with
        | [| url |] -> url
        | [| |] -> "http://localhost:9000/"
        | _ -> eprintfn "Usage: ROOT_DIRECTORY URL"; exit 1

    use server = WebApp.Start(url, fun appB ->
        appB.UseStaticFiles(
                StaticFileOptions(
                    FileSystem = PhysicalFileSystem(rootDirectory)))
            .UseSitelet(rootDirectory, Site.Main, ".")
        |> ignore)
    stdout.WriteLine("Serving {0}", url)
    stdin.ReadLine() |> ignore
    0
And we done we now have cleaner output directories for our application. It gives us the following advantage:
- cleaner binary folder
- folder based on build configuration selected
- WebSharper generated file in a different folder than .fs files
- WebSharper generated file are generated in different folder depending on build configuration
The project setup example can be found here https://github.com/Kimserey/CleanOuputDirectory/blob/master/ClientServer/ClientServer.fsproj#L29.
2. Setup output folder for single page application
For an SPA it is almost identical to a client-server application.
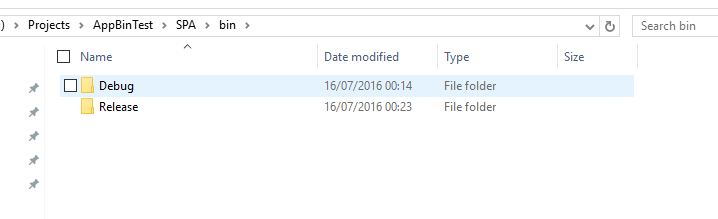
We start first by changing the OutputPath like in #1.1 and in the same way we set the WebSharperBundleOutputDir:
<WebSharperBundleOutputDir>$(OutputPath)\httproot\Content</WebSharperBundleOutputDir>
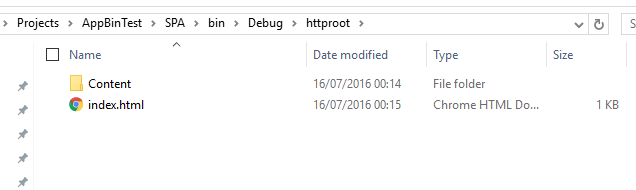
And when we compile now we end up with a nice directory structure bin > Debug > httproot.
Now the SPA uses index.html so in order to have a complete httproot, we need to copy over index.html after build.
It is possible to configure a Target copy in the fsproj like so:
<Target Name="CopyIndex" AfterTargets="Build">
  <Copy SourceFiles="index.html" DestinationFolder="bin\$(Configuration)\httproot"/>
</Target>
By doing this, after Build, the index.html will be copied and placed to the httproot folder.
Great, we are done! Now all you have left to do is to setup some automated script to just take the content of httproot and deploy your SPA!


The project setup can be found here https://github.com/Kimserey/CleanOuputDirectory/blob/master/SPA/SPA.fsproj#L35.
Conclusion
Today we saw how we could customize the output directory of WebSharper files and also how we could setup a MSBuild target to copy files. Having a predictable and understandable output folder structure make things easier when you want to automate deployment. I hope you enjoyed this post as much as I enjoyed writting it, as usual if you have any question, leave it here on hit me on Twitter @Kimserey_Lam. See you next time!
- Full code can be found on GitHub: https://github.com/Kimserey/CleanOuputDirectory.
Other post on WebSharper:
- From idea to product with WebSharper: https://kimsereyblog.blogspot.co.uk/2016/07/from-idea-to-product-with-websharper-in.html
- Transform your Websharper web app into an Android app: https://kimsereyblog.blogspot.co.uk/2016/05/transform-your-websharper-web-app-into.html
- Extract text from images in F# - OCR-ing receipts: https://kimsereyblog.blogspot.co.uk/2016/05/extract-text-from-images-in-f-ocring.html

Comments
Post a Comment