Setup HTTPS with Nginx on Azure Ubuntu VM
Setup HTTPS with Nginx on Azure Ubuntu VM
Today we will see how we can setup HTTPS on using Certbot Nginx configuration on an Azure Ubuntu VM. This post will be composed of three steps:
- Prepare the VM
- Install Nginx
- Install Certbot
1. Prepare the VM
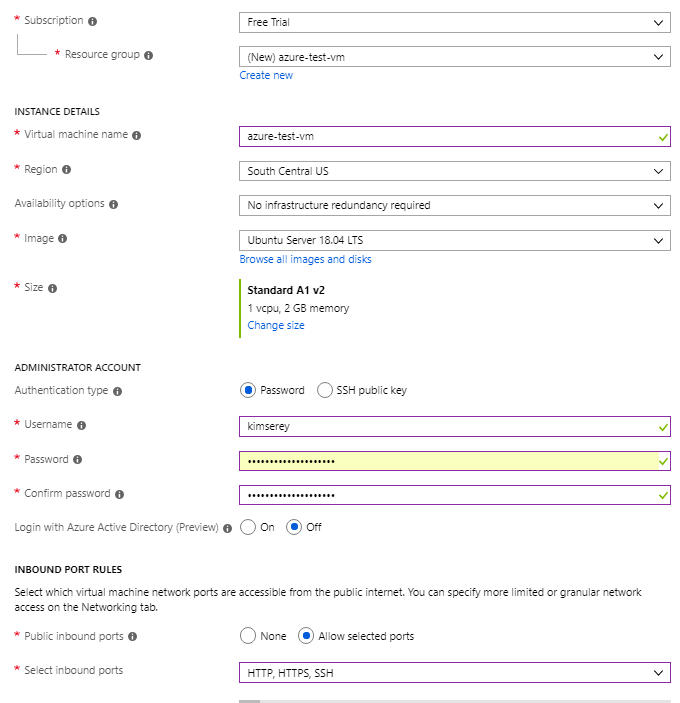
We start first by creating an Azure VM on Ubuntu 18.04 with either password or SSH and allowing HTTP, HTTPS, SSH.
Once done, we can select a custom DNS for our VM. This makes it easier to SSH but also it will be required for our SSL certificate setup.
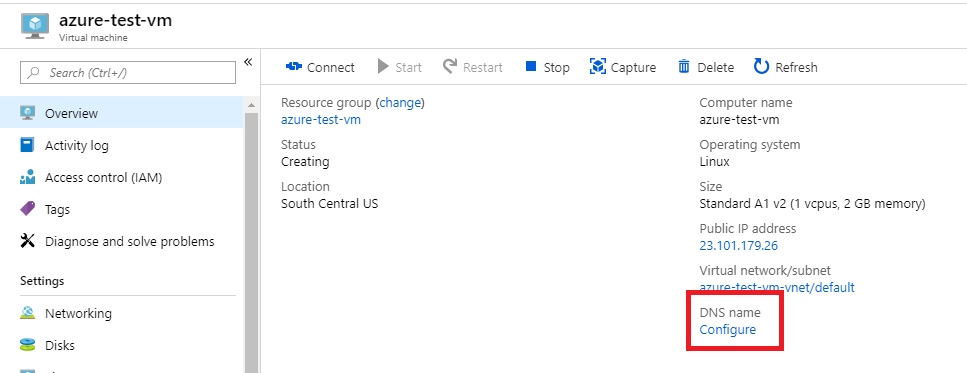
We set the Assignment as Static then we choose a DNS name label. Here we choose azure-test-vm therefore the VM will be accessible at azure-test-vm.southcentralus.cloudapp.azure.com.
We should now be able to SSH into the VM using the command:
ssh kimserey@azure-test-vm.southcentralus.cloudapp.azure.com
2. Install Nginx
Next once we are in the VM, we can install Nginx by installing the following:
sudo apt-get update
sudo apt-get install nginx
Once installed, as we already have opened the HTTP port during creation of the VM, we should be able to see the default Nginx page from http://azure-test-vm.southcentralus.cloudapp.azure.com.
Let’s then create a website configuration in Nginx under /etc/nginx/sites-available named as our server azure-test-vm.southcentralus.cloudapp.azure.com.
And paste the following configuration:
server {
  listen 80 default_server;
  listen [::]:80 default_server;

  server_name azure-test-vm.southcentralus.cloudapp.azure.com;

  root /var/www/html;
  index index.html index.htm index.nginx-debian.html;
  location / {
    try_files $uri $uri/ =404;
  }
}
To know more about Nginx, yo ucan checkout my previous blog post on how to setup ASP NET Core applications with Nginx.
We then remove the existing default setup by deleting the file under `` and creating a symlink to our new configuration.
sudo rm /etc/nginx/sites-enabled/default
sudo ln -s /etc/nginx/sites-available/azure-test-vm.southcentralus.cloudapp.azure.com /etc/nginx/sites-enabled/azure-test-vm.southcentralus.cloudapp.azure.com
The /sites-enabled folder is the folder scanned by nginx, therefore the recommendation is to add configuration in /sites-available and then link them into /sites-enabled so that we can remove them whenever we need to without losing them. For example, default file is still available under /sites-available for reference.
Next we reload nginx with the following command:
sudo service nginx reload
If we navigate to http://azure-test-vm.southcentralus.cloudapp.azure.com/ we should see the same result as earlier except this would be with our own simplified configuration file.
3. Install Certbot
Lastly to install HTTPS, we will use Certbot with Nginx configuration which is an implementation of the ACME protocol for Letsencrypt.
We do so by executing the following commands:
sudo apt-get install software-properties-common
sudo add-apt-repository ppa:certbot/certbot
sudo apt-get update
sudo apt-get install python-certbot-nginx
sudo certbot --nginx
We follow the wizard which asks first for an email to let you know when the cert is close to expiry, then to select the server, then if you’d like to redirect HTTP to HTTPS.
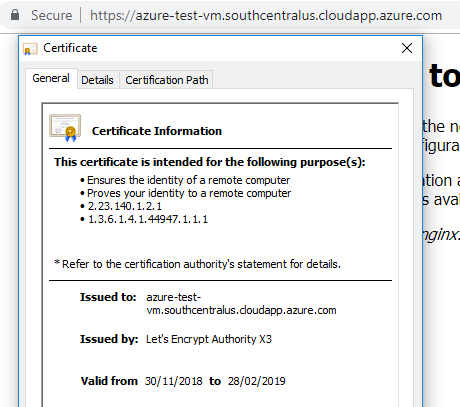
Once done, we should have our server served via HTTPS http://azure-test-vm.southcentralus.cloudapp.azure.com/. If we click on the lock, we should see that our certificate is issued by Letsencrypt.
Conclusion
Today we saw how to setup HTTPS on our server for free using Letsencrypt. We started first by looking at how we could create a VM on Azure and setup a custom DNS, then we moved on to look at how to install Nginx and configure a simple server directive and finally we finished by installing a SSL cert configuration on Nginx using Certbot. Hope you like this post, see you on the next one!

Comments
Post a Comment